Clay, porcelain, marble, granite, terrazzo, etc. these are stones which are widely considered for their elegance, energy and durability. Mostly for sale in piece or hardwood sort, they’re really popular with homeowners and are becoming a principal in many homes. Hardwood and rock installations can be difficult, but with the proper instruments and abilities, actually a starter may have great results. Installing tile leveling systems and rock is among my all-time beloved trades, and I wish to give you a number of the installation practices that I have used over the years. Let’s begin!
Hardwood and rock is extremely vunerable to movement. If you’re installing tile floor, grab up the present floor right down to the sub-floor, or plywood underlayment. Next, strengthen the sub-flooring with 2-inch screws to lessen squeaking and bouncing. Carefully clean the ground with a dry-vac and make certain it’s flat. If the sub-flooring is rotted, it must certanly be changed with new plywood of equal width, usually “3/4 inch. For Attic and concrete Surfaces, check always the entire floor for level and flatness. If essential, level up any low places and work down high spots. If you are installing wall Tiles, the surfaces must be thoroughly clean and free from debris. New drywall is recommended, and If you are tiling a tub or bath encompass use “1/2 hardi-backer or concrete board.
After your sub-floor is prepared, evaluate and formulate “1/2 backer panel to put in on top of the plywood. Backer board comes 3ft X 5ft, therefore approach a design where the panels are staggered and perhaps not coating up in a combination pattern. When your layout is total, mix some thin-set Mortar and utilizing a U or square notched trowel, distribute a coat of thin-set below each panel and then collection it set up, using mild force to have great adhesion. Using backer-board screws, mess it down approximately 6 inches aside and repeat until most of the panels are in position and secured with screws.
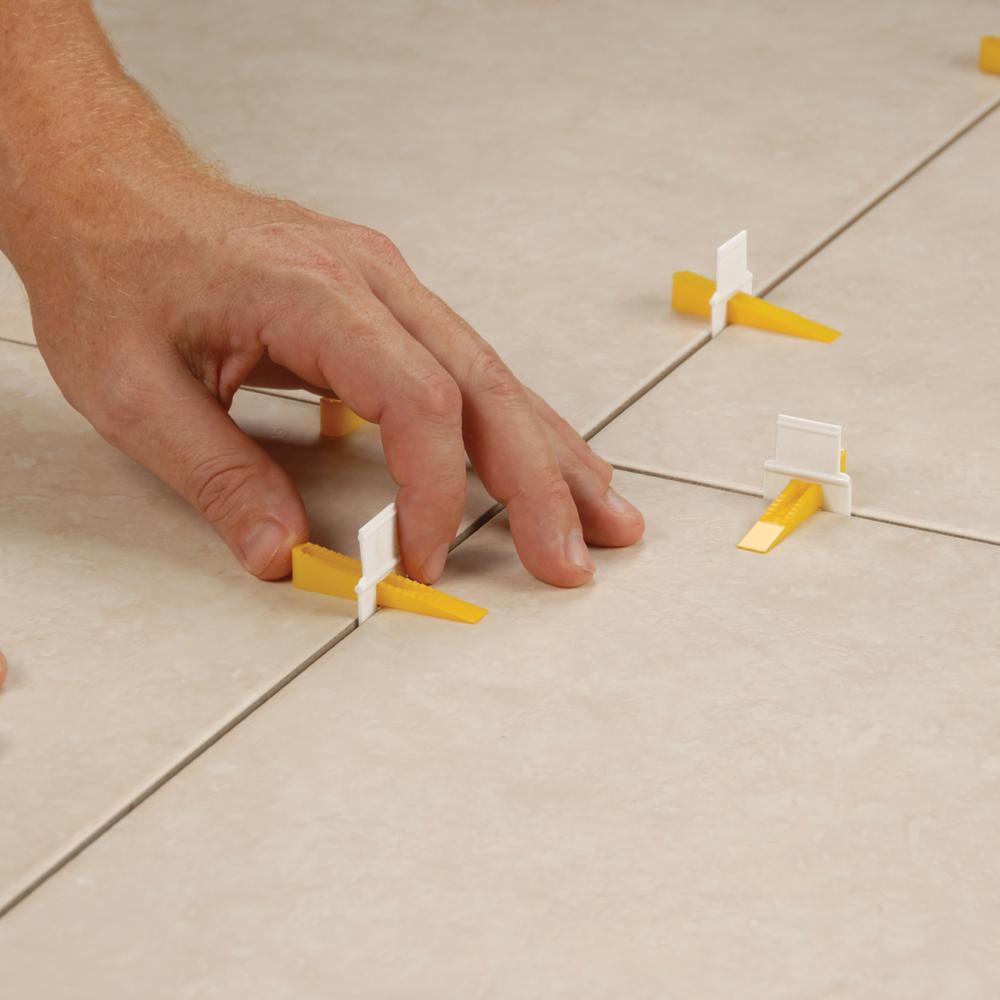
Utilize the flat conclusion of one’s trowel to spread thin-set along the joints and introduce backer-board tape. End by removing away any excess. Next, locate the best wall in the space to use as your beginning point. Utilising the 3-4-5 squaring rule, dry lay and change your tiles before you are able to get your pieces to evaluate no less than half the tile. Use flooring spacers to reach uniform grout joints, and check your work. When all is prepared begin laying your tiles.
lieu of backer panel there is a more recent underlayment for tile called Schluter-Ditra that’s a polyethylene membrane which can be set in thin-set and laid on the surface of the plywood sub-floor, and you can tile straight to it. Because of it’s characteristics it’s great for concrete sub-floors and basements, but also for big Careers it could possibly get pretty expensive. One of many cheapest strategies you can use is always to preference 16 measure cable lath to the sub-floor and then tile directly. Nevertheless, unless you are strapped for cash, I’d recommend sometimes backer-board or the Schluter-Ditra system. DO
The key to a good wall hardwood installation is to keep all your tiles stage and plumb. In shower and container surrounds, ensure your backer-board is fitted ( don’t use drywall ) and you are able to begin. start in one part, level your tile height, then make use of a stage to stage that height all over the surround. Then evaluate the guts wall of the encompass and tag the dead center, and plumb that line around your desired top using a level. Starting only at that center range, dry set your tiles with the grout bones, and make certain all reductions end in the sides ( regulate your lines if necessary. )